HowTo Update Allwinner A23 CPU devices Using [PhoenixUsbPro] Flashing Guide
Things you may Need (The ones marked with a * are not optional):- Stock firmware ROM*
- PhoenixSuit Key*
- PhoenixUSBPro* (Even if people keep calling it PhoenixSuit, thats its name when you install it)
- Semi-bricked Tablet* (Stuck on Logo, Cant enter recovery, etc.)
- Windows XP x86 or Windows 7 x86 / x62 *
- Patience**
This is a READ FIRST and READ-WHILE-ON-IT tutorial, Make sure to READ IT FIRST and then you can read it while youre doing it. If you attempt to do it while youre reading it without reading it first you'll be propense to make tedious mistakes.
Let's get on it.
Install PhoenixUSBPro and once its installed, open it.
Phoenix is just like livesuit but they have a bigger interface, youll see the task buttons on top:
Key file | Image | Debug View | Start | Help | Update | Exit | []reboot
below it shows your USB Hub status (internal and external)
and on the right side theres a box to hold your failed or succededly flashed devices.
DONT connect your tablet yet.
Press the key file button and navigate to where your Key file is and double click on it to select it.
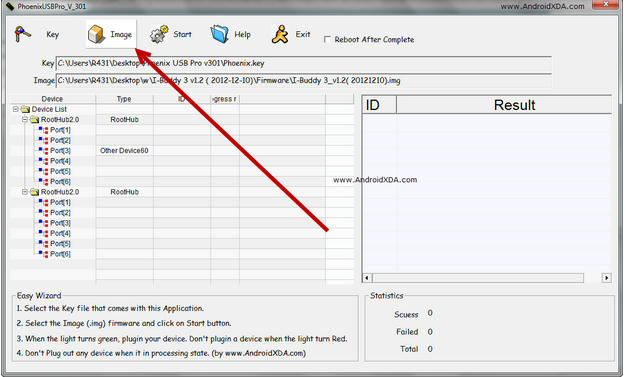
Press the Image button and navigate to where your *.IMG Stock firmware rom file is and double click on it to select it.
Youll see a (X) red Icon on the right. Dont mind it yet.
DONT connect your tablet yet.
Press Start. The red Icon should have turned to GREEN. If it didnt, something went wrong, they key file or the *.IMG rom file are damaged, corrupted, downloaded wrong or they are invalid. Search for a working ROM or start again the tutorial.
(Most of the times it should do just fine).
after the Icon has turned green, we are ready to connect our device.
First connect your USB Cable to your computer and leave your tablet disconnected
Make sure your tablet is completely turned off.
Before connecting your tablet, press the Volume+ button (or search your device's FEL Button on google / Linux-sunxi) for the Q88Pro, and Q8H is Volume+, probably for others the same.
Ok, Hold the Volume+ button pressed down and connect your USB Cable to your Tablet (While holding the Volume+ button down).
Right after connecting your USB Cable into your tablet (without releasing the Volume+ Button) Start pressing your POWER button repeatedly, One time every second.
At the sixth time (for some devices you need to press it 10 times or more) it will pop in your USB Hub interface box a device. Wait a few and it will appear your connected tablet.
It will say: Your device's queued ID and the process percent.
Mostly starts fast til 7% and then it continues to 53% then it does the job.
It'll take about 2"5 mins so be patient I know you want your tablet restored.
After its done it will appear on the right box if it succeeded or failed and the time the flashing took.
now you can press Stop and disconnect your tablet.
In the FEL Mode, even if your tablets screen is deep black, it might be still turned on.
So firstly try to turn it on normally holding your power button for about 3 to 5 seconds, if nothing seems to happen you need to force-shutdown first, for it: hold your power button for about 10 to 15 seconds. After that your tablet should be powered down, proceed to turn your tablet on. VOILA!!, good work guys.!
phoenixusbpro flashing guide for new user
Here im adding something for new user with pic
1st Downlod Letest Flasher From here
NT: Letest Phonixcard also can flash a23 available on following link
Here we go Phoenixusbpro flashing guide :
1. open phoenixusbpro folder and open PhoenixUSBPro.exe
[for win 7 user run as Adminishtrator ]
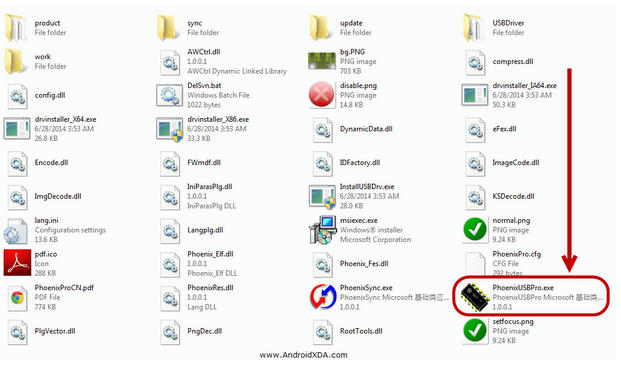
2.Click no key bottom from top
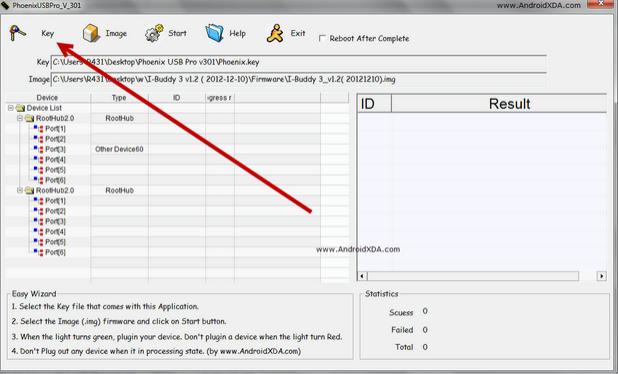
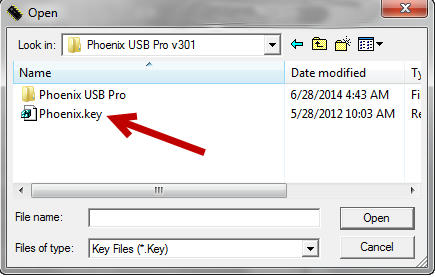
3. select key file from phoenixusbpro key folder [ only for 1st time farther when you use it will auto detect key file ]
4.now click to image button and select downloded firmware
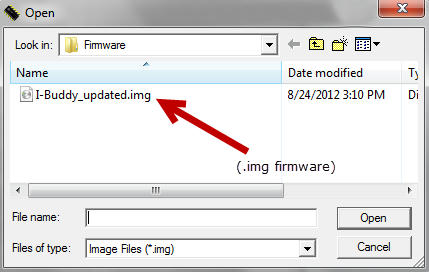
5.now after select image click to start button
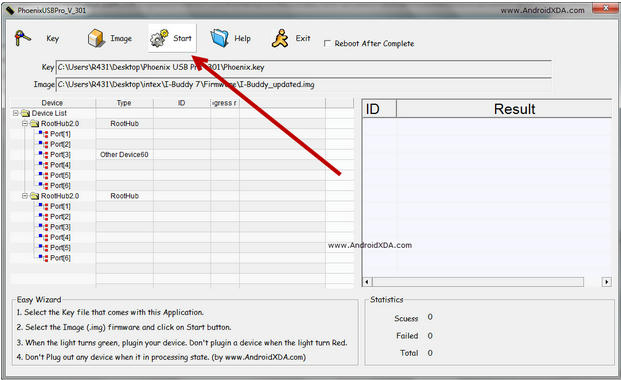
6.after select start you will see a green trick mark at and of left side
this mean all ok you are ready to flash your tablet
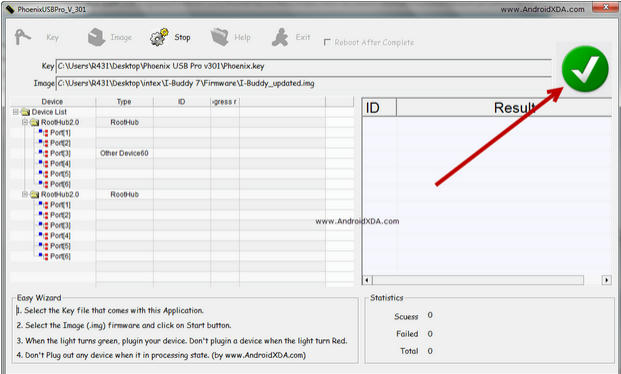
8.final stage you have to force tablet in flash mode by key combintions [its same as livesuit flashing stage ]
HOLD on vol + or - key then connect usb to tablet and quickly keep pressing power button few times 10-15-20 you will see flashing process started software will detect your tab usb
and wait for finished massage
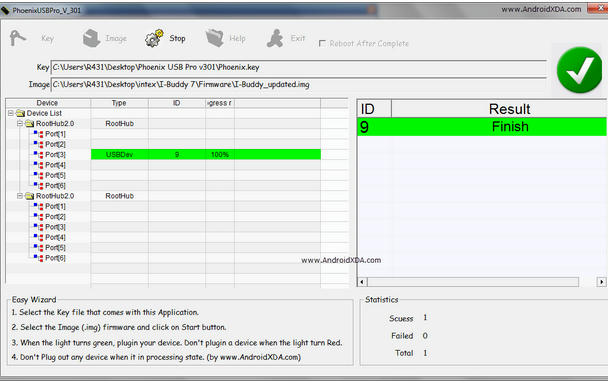
All done now disconnect and power on your tablet
Tidak ada komentar:
Posting Komentar